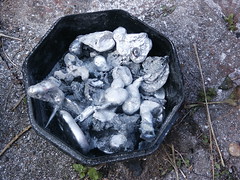
Well I'm chuffed. Home-made charcoal burns nice and hot. I took it all apart this morning and found big globs of melted aluminium and lots of cans with the paint burnt off.
More importantly, I've sold some unwanted stuff on ebay so I now have a nice large pay-pal balance to spend on modeling clay. The next few weeks will see me working on the mold side of the process and then building the furnace.
Monday 26 October 2009
Sunday 25 October 2009
Making slow progress
Hello
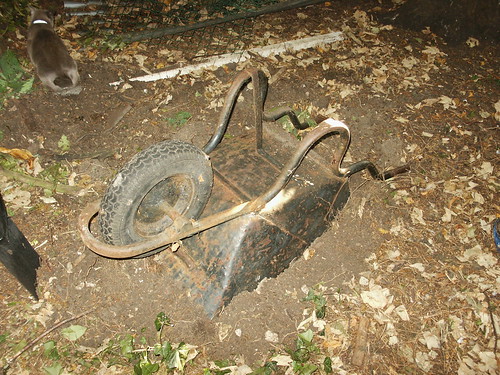
I almost can't believe it's been a whole month since I did anything. Except I only like setting fire to things at the weekend as then my wife's around to watch the children, so really it's only four weekends.
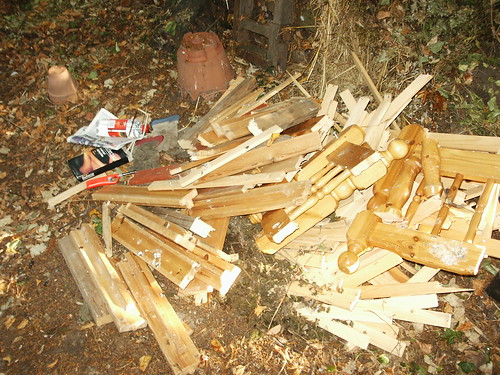
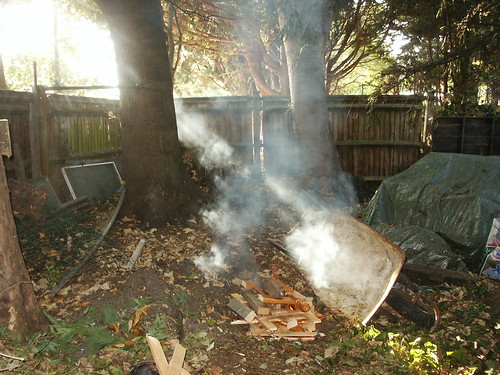
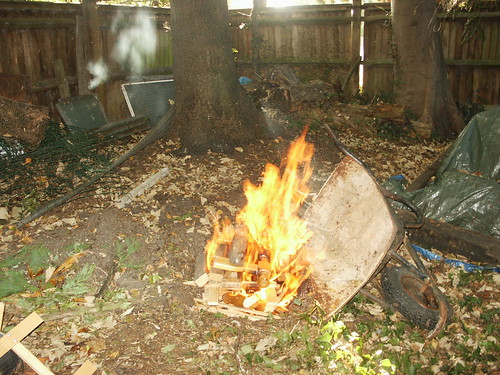
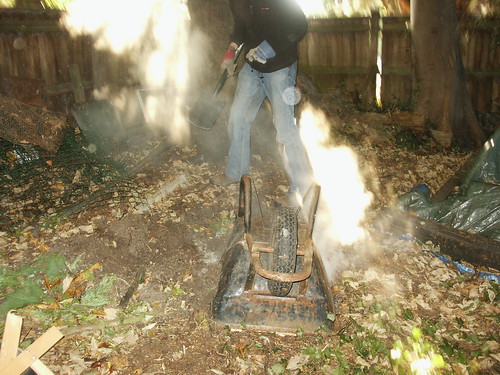
Anyway, a neighbour told me of a recently dismantled wooden greenhouse that was fit for fire-wood, so I popped over and rescued a barrow load. Yesterday I stacked it up in the fire pit and this time I checked it cold for the fit of the barrow and re-adjusted it. I also drilled 6 x 10mm holes in the bottom of the barrow, in the hope that air would come in around the bottom and out through the top. It all lit fine and I let it burn for quite a while before it was all really raging, then I barrowed it! I also left a lot more air gaps around the sides. When the smoke had subsided to blue haze, I totally buried it.
In the morning (this morning) I went back and found lots of charcoal. In fact the charcoal had worked so well that it had already started melting some of the aluminium window fittings from the greenhouse. This evening I started off a burn to purify some cans with my own, home-made charcoal.
It appeared to be burning really well until I foolishly decided to adjust the lid to keep more of the heat in and dropped a brick right into the middle of the furnace... I put a lid on with a brick to reflect some of the heat back in and when I moved it, it flipped over and dropped the brick... hopefully it hasn't dampened the flames too much.
I'll have a look tomorrow when it's cooled down a bit and see how much melting has gone on.
Graham
I almost can't believe it's been a whole month since I did anything. Except I only like setting fire to things at the weekend as then my wife's around to watch the children, so really it's only four weekends.
Anyway, a neighbour told me of a recently dismantled wooden greenhouse that was fit for fire-wood, so I popped over and rescued a barrow load. Yesterday I stacked it up in the fire pit and this time I checked it cold for the fit of the barrow and re-adjusted it. I also drilled 6 x 10mm holes in the bottom of the barrow, in the hope that air would come in around the bottom and out through the top. It all lit fine and I let it burn for quite a while before it was all really raging, then I barrowed it! I also left a lot more air gaps around the sides. When the smoke had subsided to blue haze, I totally buried it.
In the morning (this morning) I went back and found lots of charcoal. In fact the charcoal had worked so well that it had already started melting some of the aluminium window fittings from the greenhouse. This evening I started off a burn to purify some cans with my own, home-made charcoal.
It appeared to be burning really well until I foolishly decided to adjust the lid to keep more of the heat in and dropped a brick right into the middle of the furnace... I put a lid on with a brick to reflect some of the heat back in and when I moved it, it flipped over and dropped the brick... hopefully it hasn't dampened the flames too much.
I'll have a look tomorrow when it's cooled down a bit and see how much melting has gone on.
Graham
Tuesday 22 September 2009
Charcoal III
Progress is being made. Now the thin bits that I thought of as kindling are turning to charcoal and the big lumps are becoming brown ends. So I think the next stage will be to do a proper charcoal stack with a hole in the middle made out of the thinner bits of wood. Then I'll chuck a newspaper/firelighter combo down the middle and cover it with the wheelbarrow and treat it as before.
Cheers
Graham
Cheers
Graham
Charcoal II
Right so. That didn't work then! I got maybe a handful of charcoal from the bottom and a lot of charred wood.

So, I listened to what I'd been advised on Creative Living forum and made a nice neat stack of fresh wood on top of kindling...
... waited til it was all nicely alight and blazing...
... then tipped over the barrow again.
But, this time I'm leaving some air gaps around the edge.
Now we really are into trial and error. I'll just leave it for a bit. At least I know it's still burning under there with restricted oxygen. If this doesn't work I'll bash some holes in the wheelbarrow with a chisel and bury it totally around the edges so I have more control over the amount of air by covering holes. I might also go look for pictures of oil-drum burns and the like to get a rough idea of how much air hole is needed for what size of burn.
Still, as they say, you learn more from things that don't work!
Graham
Making Charcoal I
Right so. The reason I've stopped melting things is that I couldn't afford my charcoal habit! So after some very diligent months of reading Freeglecycle every day I have accumulated everything I need to make my own. Hopefully.
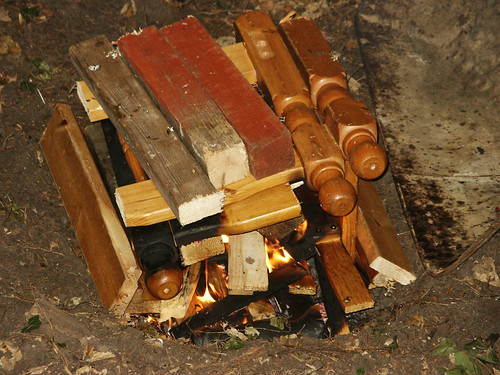
Here's a big pile of wood, chopped to size, with fire-lighting things and gloves.
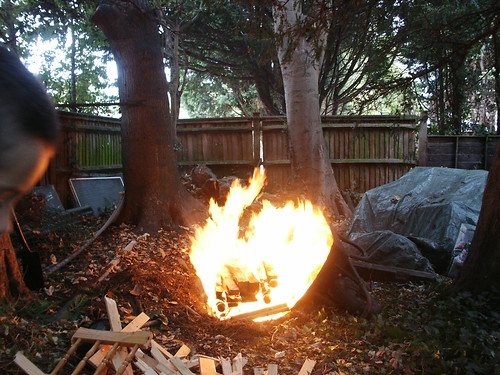
Here's the fire all laid and just getting going.
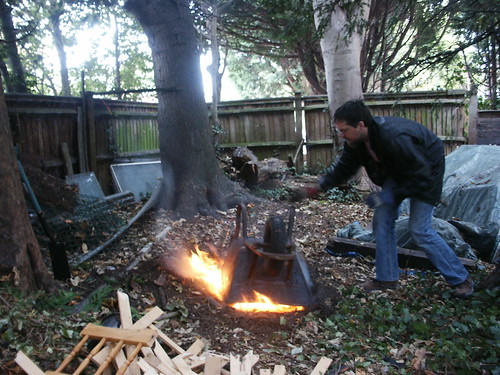
Nice blaze now. Time to put on gloves and take courage in both hands!
Action shot of me wielding spade to start sealing it off.
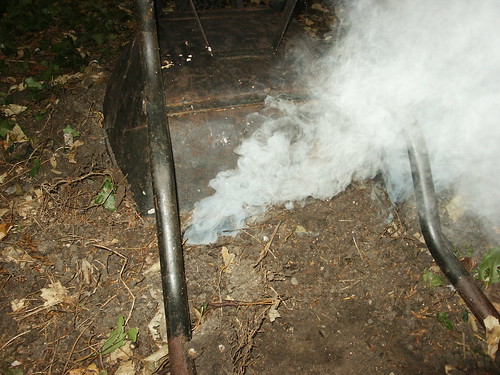
Finished article - one slightly smoking wheelbarrow!
I can't seem to link back to the pictures so here's the link to my photostream - www.flickr.com/grahams_pictures - if you want to see big shots or indeed any of the other random stuff I take photos of.
In a couple of days I'll see if it feels cool and whether I feel like digging it up... and then I'll know if it worked or not.
Graham
Here's a big pile of wood, chopped to size, with fire-lighting things and gloves.
Here's the fire all laid and just getting going.
Nice blaze now. Time to put on gloves and take courage in both hands!
Action shot of me wielding spade to start sealing it off.
Finished article - one slightly smoking wheelbarrow!
I can't seem to link back to the pictures so here's the link to my photostream - www.flickr.com/grahams_pictures - if you want to see big shots or indeed any of the other random stuff I take photos of.
In a couple of days I'll see if it feels cool and whether I feel like digging it up... and then I'll know if it worked or not.
Graham
Friday 28 August 2009
It's been a while
I've been a victim of low resources - money, time and health. On the money front I've been scanning Freecycle pretty much every day I've been around to collect stuff and that's starting to pay off. I now have an old metal wheelbarrow and a load of wood, mostly an old bed and shelving unit.
While this might sound like junk, I have a plan! Dig a hole about the size and shape of the wheelbarrow, stack the wood in it and set fire to the lot. When it's blazing away nicely, upend the wheelbarrow over the fire and bury it with the spoil from the pit. After two to three days it should have gone cold and when you dig it out, it'll be full of charcoal.
The only trouble is that I've put my back out and we're getting to the end of school holidays. So I haven't had either the time or the energy to dig a big hole and light a fire. But at least I feel like some progress is being made. And once I start digging holes, I might carry on and actually make a furnace too...
Graham
Thursday 4 June 2009
Quality counts!
Well, I used up three different bags of old charcoal and nothing dripped out of the bottom of the furnace. It took nearly two hours to start burning properly as well. I'm guessing now that it's right on the edge of developing the 660 degrees centigrade that I need. Which does make sense as last burn was quite partial in terms of what melted and what didn't. So next time I'll go with new good quality lumpwood...
On a more positive note, with all the heat my green sand dried out but held the shapes that I pushed into it, so sand casting is looking workable at the moment.
Cheers
Graham
On a more positive note, with all the heat my green sand dried out but held the shapes that I pushed into it, so sand casting is looking workable at the moment.
Cheers
Graham
Monday 1 June 2009
Another burn
Hi
The furnace is running again. I used old charcoal on top of fresh and it took a couple of hours and lots of meths to get it all burning OK. No sign of any aluminium dripping out from underneath which is a shame. I had used green sand and made some impressions to test it out but I guess with the slow start it just never got up to temperature.
Tomorrow will tell what happened.
Graham
Friday 22 May 2009
Sand
Yesterday I got some bentonite clay in the post from ebay.
So in the evening I started sorting out the sand that I rescued from the preschool sandpit. As you can see it's full of bark chips, twigs and leaves. I gradually sieved it through a garden sieve and then a kitchen sieve (bought for the purpose).
Now, through Yahoo groups I've found that it might be the wrong sort of sand as it's not sharp sand. But on the plus side I've found there is a foundry in my local area that sounds all arty and interesting so I'll give them a ring later and see if I can scrounge some sand and hopefully advice as well!
Graham
Tuesday 19 May 2009
Bentonite clay
My cunning plan is slowly working. I've been listing things I don't need on ebay to generate enough money to buy the things that I absolutely can't make, scrounge or recycle. So I've just sold two books, which has given me enough in paypal to buy 750g of bentonite clay which should make proper foundry green sand for casting.
I'm hoping to make some jewellery without a crucible just by putting catch trays under the next burn, with green sand in and designs pressed in that I can then turn into jewellery...
Graham
I'm hoping to make some jewellery without a crucible just by putting catch trays under the next burn, with green sand in and designs pressed in that I can then turn into jewellery...
Graham
Saturday 16 May 2009
Charcoal and Copper
Isn't the internet great? When I was a student 20 years ago the internet was basically user-groups. Now, with everything else, the most useful bits are sometimes forums and yahoo! groups. I've just been told that my aluminium will flow better with 5%-6% copper added to make an alloy. That's just saved me a lot of experimentation and googling so thanks guys!
Also I've now found that bioregional charcoal has moved to Sainsbury's from B&Q. It's twice the cost but it says that it supports coppicing and local charcoal production. I'll do some quick googling to check it's all true, but I expect that's the direction I'm going in. Either that or scrounge some wood and start a fire for charcoal. I've done it before, so I know how to do it. It's just another stage that I hoped to bypass this time!
So off to Freecycle to keep an eye out for any copper scrap and firewood. Plus an old wheelbarrow for making a charcoal clamp. I'm also asking around to see if I know any plumbers who could collect pipe offcuts for me. I do have some pipe in the garage that I could use if need be.
Thanks for comments and followers!
Cheers
Graham
Friday 15 May 2009
Flickr set
Here's a link to my set of photos on Flickr. I'll blog when I add photos but may not always get around to putting every photo across on here.
http://www.flickr.com/photos/grahams_pictures/sets/72157617864504151/
Cheers
Graham
http://www.flickr.com/photos/grahams_pictures/sets/72157617864504151/
Cheers
Graham
Thursday 14 May 2009
Introduction
Hi
Finally I've got a bit of peace and quiet to properly explain what this blog is for.
I have this project to investigate whether it would be possible to cast my own statues out of molten aluminium from drinks cans. I've already started and have comments spread between different forums and Flickr. So I've started this blog to bring everything together in one place. I'll put some of my Flickr pictures up on here, but they're all in one set so if you click on one to get to Flickr, you'll be able to see all the rest.
My initial thinking was that the Bronze Age started some 5,000 years ago, so surely it should be quite easy by now. I've always had an interest in pre-history so that inspired me to look into early forms of casting and that led me on to the subject of coffee can foundries. While my current foundry isn't made in a coffee can per se, it is still very primitive and basic and does manage to melt aluminium using charcoal as a fuel and without any air being forced in to drive up the temperature.
The other side of the project is the actual making of the statues. Here, I am using Das air setting modelling clay to make an original statue. When I'm happy with this then I will use some sort of silicone rubber mix, usually used in candle mould making, to make a rubber mould of it. This will be used to produce wax blanks, like candles without wicks. These wax statues will be packed in foundry sand and baked in an oven, which will melt the wax. Finally I'll take the blocks with the sand in and pour in molten aluminium, which will (hopefully) produce statues. My inspiration for the statue design is the Willendorf Venus, and other goddess statues of that era.
In this way, the whole project will tie together very modern ideas, like drinks cans and aluminium, with older ones, from both the Bronze Age, and then even further back into the Stone Age, to evoke something 25,000 years old. It is also a very direct link to recycling. I've shown several friends the lump of aluminium and they've been very interested. It's so different to most people's experience of recycling, which is sending stuff away in a lorry never to be seen again. Here, it's real and direct. I'm collecting my own cans, from friends and colleagues and trying to pick one up as rubbish each day as well.
Pure metal
This is the final outcome that I wanted from stage one - pure metal to go into a crucible for stage two.
Hello
An initial test post before I start to pull together all the information about this project. Probably when the children are asleep!
Subscribe to:
Posts (Atom)